Shop Policies  My Account  Shopping Cart

September 30, 2010

How-To: Make Background Paper

Here's an easy-peasy lesson in making the "background" paper you'll find on many Bean Up The Nose Art products.  (Don't you just want to click over to those products and BUY SOME RIGHT NOW?!?!)  

1.  These are your material friends:  plain old manilla file folders (the best kind of paper I've found to hold the Color Wash): 


and Ranger's Adirondack Color Wash . . .spray bottles . . . many fabulous colors.  Here, we're going to use "Butterscotch" -- which appears on lots of Bean Up The Nose Art's products.  (Don't you just want to click over to those products and BUY SOME RIGHT NOW?!?!?!?!?):

2.  Spread baking parchment paper (or, you can be a fancy pants crafter and use a craft sheet) on a floor, table, or counter space -- that you don't mind getting stained if things get sloppy. The point with the parchment paper/craft mat is for the Color Wash to bead up onto it, instead of soaking in.

3.  Spray the Color Wash onto the parchment paper:


A couple of squirts will do it.  I generally combine two -- or at the most, three -- different Color Wash colors . . . a couple of squirts of each onto the parchment paper.  For a more fluid look, spray a little water over the top as well, which will make the colors run together.

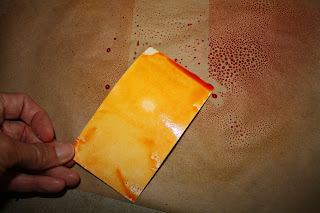
4.  In this photo below, you can see the way the Color Wash/water has beaded up.  That's what we want.  Now, gently pat the file-folder paper onto the Color Wash/water mix.  Be random!  It doesn't matter.  Whatever way you place the paper, pat it down, drag it across . . . IT WILL BE FINE!!! This is not for the fussy, and for sure not for the perfectionistas.  This is a fun job for those of us who like our projects to be easy-peasy, forgiving, and instantly-gratifying.  (And, no, I don't know whose wrinkly old fingers are holding that paper . . . .)
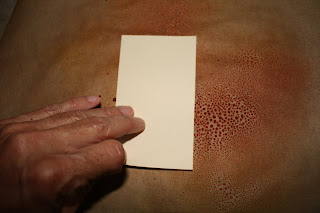

5.  Turn the soaked paper over.  See?  Beautiful!  

Set it down to dry, color-wash-side-up, on some clean parchment paper.  It will curl up a bit as it dries.  Don't worry.  You can stick it between the pages of a book to flatten it after it's all dry.Also, be aware that the colors you see when the project is wet are much more popping and in-your-face vibrant than they will be when the Color Wash dries -- into more muted tones.

6.  And voila!  Twelve or so hours later, you have a fabulous beginning to your collage piece . . . .


Brick & Mortar Sales . . . and Luggage Tag Classes!

Bean Up The Nose Art is lucky enough to have many good brick & mortar friends up on Whidbey Island, Washington.  Today we're happy to highlight a great collaborative spot at 770 SE Pioneer Way, Oak Harbor:  


As you can see below, the fabulous women who share this space -- Naomi, Vicki, and Mary Jo -- know how to make it work.  Great design sense, terrific prices, and the perfect blend of paper crafts, supplies, unique gifts and home decor.  
  
Tomorrow (and Saturday) they're hosting the "Pioneer Market Sale" from 10 a.m. to 5:00 p.m. . . . the first in a series of first-weekend sales of "vintage antiques and time-worn but treasured items."  I will be there at 10 a.m. tomorrow to try to snag cool distressed display pieces before you do.

And delight of delights . . . in a couple of weeks, Bean Up The Nose Art gets to give luggage-tag making classes in the Collage space.  Here's a look at the kinds of things we're making:   


We'll bring lots and lots of supplies for you to create your own kinds of beauties.  This is a never-fail project.  Everyone who takes this class comes away with their own terrific pieces of collage art, which we then turn into cards to insert into the luggage tag.

Come play!  Two classes available on Wednesday, October 20:  10 to noon, and 6:00 p.m. to 8:00 p.m.  $25.00 per person.  Post tamara@beanupthenoseart.com if you'd like to attend, or contact Naomi at Collage:  360.675.1741.  (And ask about her other terrific October crafting classes, too!)

Tomorrow:  an amazingly-simple lesson in how we make the cool ink-y backgrounds for these and all our greeting cards . . . .

September 27, 2010

Welcome!

Thanks for clicking on to us!!!

AND. SO. ARE. YOU!!!!

We here at Bean Up The Nose Art believe . . . right down to the bottoms of our socks . . . that you can't NOT be a fabulous person if you're here.  And you are!!!  

Thanks for stopping by! Have fun browsing our products!  (Order as many as you want.)  Come back any time!  Bookmark us!

Now that the website's officially up and running, we'll be posting a couple of times each week to update you with new products . . . sales . . . contests . . . "how to" collage art techniques . . . friend and vendor profiles . . . giveaways.

And here's our first one!  The first ten "followers" of this blog (see column at right . . .) will receive a special Bean Up The Nose Art paper art gift.  (Make sure your contact information is listed in your profile, so I can contact you about where to mail . . . .)

Cheers!!!!

September 26, 2010

Happy BigA#@ Birthday, Steph!


In fall, 2005, I made my first trip to Whidbey Island, Washington . . . which has become my (and Bean Up The Nose Art's) home-away-from home. 

While visiting, I wandered into "The Paint Escape" -- a paint-your-own pottery studio, which has since been left to the trusty hands of another friend, the fabulous Ms. Tina -- and the rest is history.   Stephanie and Ruth were the shopkeepers; I was a death-penalty-appeals lawyer looking for a place to nurse my creative soul.  They invited me into their tribe of fabulous crafters and friends.  I would not have become an artist without these folks.  And I would not have gone into the business of selling art without the wisdom, encouragement and belief of Stephanie.

Last Saturday night, Ms. Stephanie celebrated a big birthday.  (We won't say the year.)  It was a terrific shindig at Mukilteo Coffee, attended by all the tribe.Happy birthday, Steph!!!  Thanks for everything, always!(She's the one in the birthday hat.  And howdy to Ruth!)    


 Footer