

Here's an easy-peasy lesson in making the "background" paper you'll find on many Bean Up The Nose Art products. (Don't you just want to click over to those products and BUY SOME RIGHT NOW?!?!)
1. These are your material friends: plain old manilla file folders (the best kind of paper I've found to hold the Color Wash):

and Ranger's Adirondack Color Wash . . .spray bottles . . . many fabulous colors. Here, we're going to use "Butterscotch" -- which appears on lots of Bean Up The Nose Art's products. (Don't you just want to click over to those products and BUY SOME RIGHT NOW?!?!?!?!?):
 2. Spread baking parchment paper (or, you can be a fancy pants crafter and use a craft sheet) on a floor, table, or counter space -- that you don't mind getting stained if things get sloppy. The point with the parchment paper/craft mat is for the Color Wash to bead up onto it, instead of soaking in.
3. Spray the Color Wash onto the parchment paper:

A couple of squirts will do it. I generally combine two -- or at the most, three -- different Color Wash colors . . . a couple of squirts of each onto the parchment paper. For a more fluid look, spray a little water over the top as well, which will make the colors run together.
4. In this photo below, you can see the way the Color Wash/water has beaded up. That's what we want. Now, gently pat the file-folder paper onto the Color Wash/water mix. Be random! It doesn't matter. Whatever way you place the paper, pat it down, drag it across . . . IT WILL BE FINE!!! This is not for the fussy, and for sure not for the perfectionistas. This is a fun job for those of us who like our projects to be easy-peasy, forgiving, and instantly-gratifying. (And, no, I don't know whose wrinkly old fingers are holding that paper . . . .)
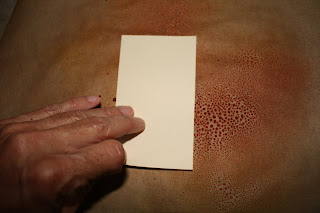

5. Turn the soaked paper over. See? Beautiful!

Set it down to dry, color-wash-side-up, on some clean parchment paper. It will curl up a bit as it dries. Don't worry. You can stick it between the pages of a book to flatten it after it's all dry.Also, be aware that the colors you see when the project is wet are much more popping and in-your-face vibrant than they will be when the Color Wash dries -- into more muted tones.
6. And voila! Twelve or so hours later, you have a fabulous beginning to your collage piece . . . .


No comments:
Post a Comment